Italian

Almond Orange Biscotti

Almond Orange BiscottiI keep a list of recipes I want to try and potentially post to the blog if they go well. I’ll be the first to admit that they don’t always go well. I burnt soup this weekend. One time I made mini pumpkin pies that turned into mini pumpkin blobs. I’ve made caramel filled rice cereal bars that were so chewy they could probably take out a filling. *Sigh*.

Almond Orange BiscottiAlmond Orange BiscottiI’ll end my pity party there because there are also those recipes that are SPOT ON the moment I try them and it makes my day. Sometimes my week…small victories, people. Small victories. Let’s talk almond orange biscotti. SPOT ON! I didn’t even really know I had any love of biscotti until I made these. Can I just say again how SPOT ON these are?! Okay, I think you all get it.

Almond Orange BiscottiA few of my favorite parts of these cookies are:

  1. They look super fancy and hard to make BUT they’re not. For reals.
  2. I’ve heard rumors that properly stored these guys can last like a few weeks or a month. I may never know if this is true.
  3. The almond orange biscotti are not overly sweet thanks to the nut and citrus flavors.
  4. Chocolate.
  5. Biscotti make it totally appropriate for adults to dunk their cookies. In fact, that’s what they’re made for!

This is a fairly traditional recipe for biscotti but let me tell you, I am psyched to try new combinations of flavors! Granted, most will probably involve dunking them in chocolate. I’m pretty sure most everyone will be okay with that.

Almond Orange BiscottiP.S. I don’t drink coffee because I’m weird like that. I dunked these in milk. YUM. 

Almond Orange Biscotti
Yields 24
A traditional biscotti, or twice baked cookie, that's perfect for dunking!
Print
Prep Time
20 min
Cook Time
50 min
Total Time
1 hr 40 min
Prep Time
20 min
Cook Time
50 min
Total Time
1 hr 40 min
Ingredients
  1. 2 1/2 cups all-purpose flour
  2. 1 cup sugar
  3. 2 teaspoons baking powder
  4. 1/2 teaspoon cinnamon
  5. 1/4 teaspoon salt
  6. 4 eggs + 1 egg for egg wash
  7. 1 teaspoon vanilla extract
  8. 1 tablespoon orange zest (or zest from about 1 medium orange)
  9. 1 cup whole almonds, toasted*
  10. 1 tablespoon water
  11. chocolate chips, to dip biscotti (1-2 cups depending on how you dip them)
Instructions
  1. Preheat oven to 350 degrees Fahrenheit.
  2. In a large bowl, combine the flour, sugar, baking powder, cinnamon, and salt.
  3. Beat in 4 eggs, vanilla, and orange zest until it forms a ball. It will start out looking rather crumbly so be patient!
  4. Stir in toasted almonds.
  5. With clean, damp hands form 2 logs on parchment-lined baking sheets. Each log should be about 4 inches wide and 3/4 inch tall.
  6. Whisk together remaining egg and water for egg wash. Brush each log with egg wash.
  7. Bake for 25 minutes, or until golden brown on top, rotating pans at the halfway point.
  8. Transfer logs to a wire rack and let cool for about 20 minutes.
  9. Use a large serrated knife to cut 3/4 inch slices. I cut mine on the bias, or diagonal, but you can also cut straight across.
  10. Place the slices, standing up, on a parchment lined baking sheet.
  11. Bake for another 25 minutes.
  12. Transfer to a wire rack to cool.
  13. Melt the chocolate chips (I used a double boiler but you could also microwave them, checking and stirring every 30 seconds). Dip* biscotti in chocolate and let cool on parchment paper.
  14. Store in an airtight container.
Notes
  1. *To toast the almonds, I just put the whole almonds in a dry skillet over medium-low heat and toasted them until they started to become fragrant
  2. *I dipped my biscotti in chocolate along the bottom edge but you could also dunk them in the chocolate (like you would dunk it into a drink). I've even seen some with drizzle on them. I like the bottom coated because you get a little chocolate in every bite but it doesn't cover up the cookie so you can still dunk it in your drink!
Flavor From Scratch https://www.flavorfromscratch.com/

Focaccia Grilled Chicken Sandwich

Focaccia Grilled Chicken SandwichIf you missed my love story about focaccia, you can read it here. The love is real. So real, in fact, that my recipe makes 2 whole loaves of the magical bread. That’s stupendous if you are having guests for dinner. It might even be stupendous if you are super duper hungry and plan to eat an entire loaf in one sitting. Don’t judge, please. I can neither confirm nor deny that this may or may not have happened.

Focaccia Grilled Chicken SandwichHowever, since it’s currently just Travis and I typically eating the focaccia recipe at our house, we usually have plenty of leftovers. Perfect for creative leftover recipes like this focaccia grilled chicken sandwich! I’d like to say that this is a totally Italian take on a chicken sandwich…But then I threw some guacamole in there and made it a bit of a mutt of a recipe. Sorry I’m not sorry about that. It’s too delicious to be sorry.

Why is this focaccia chicken sandwich a winner? The bread is salty and rich, the cheese and guac are creamy, and the chicken and veggies are fresh and delicious. Oh, and then throw some herbs/spices on there and BOOM! You have a taste explosion. In your mouth.

Focaccia Grilled Chicken SandwichSo, first make the focaccia and enjoy it for all it’s worth with some pasta or whatever you may desire. Then, take what’s left and make yourself a sandwich that will leave you asking for more.

Focaccia Grilled Chicken Sandwich
Yields 4
Chicken sandwich with an Italian twist...focaccia bread, mozzarella cheese, and Italian herbs
Print
Prep Time
5 min
Cook Time
5 min
Total Time
10 min
Prep Time
5 min
Cook Time
5 min
Total Time
10 min
Ingredients
  1. 1 thick loaf of focaccia*
  2. 1 pound grilled chicken, sliced
  3. 4 thick slices of fresh mozzarella cheese (about 6-8 ounces total)
  4. 1/2 teaspoon dried oregano or Italian herb blend
  5. 1/2 teaspoon red pepper flakes
  6. 4 leaves of romaine lettuce
  7. 1 tomato, sliced
  8. guacamole (about 2 tablespoons per sandwich)
Instructions
  1. Slice the focaccia loaf into quarters. Slice each quarter in half so there is a top and bottom half.
  2. On a parchment lined baking sheet, place the bottom halves of the focaccia topped with the grilled chicken, mozzarella cheese, oregano/Italian herb blend, and red pepper flakes. Put the top halves of bread on the baking sheet next to the bottoms halves, cut side up (so they can toast).
  3. Broil on high until the cheese melts and the bread is lightly toasted, about 3-5 minutes.
  4. Add lettuce, tomato, and guacamole.
Notes
  1. *I used my focaccia recipe to make this sandwich.
  2. This is only a guide to a sandwich. Please, make it your own with this recipe as a starting point! Then share what you made in the comments!
Flavor From Scratch https://www.flavorfromscratch.com/

Rosemary Focaccia

focacciaI’ve had a handful of meals that I would consider particularly memorable in my life. The meal after Travis and I got married in Savannah, Georgia immediately comes to mind as well as the meal Travis and I ate in a revolving dining room overlooking Niagara Falls. Then there’s the meal I shared with my family at Pinocchio’s restaurant at Disney World overlooking the It’s a Small World ride. Hey, just because I was probably 8 and eating chicken fingers doesn’t mean it wasn’t life changing.

I’d have to say that definitely in the top 5 most memorable meals in my life so far was the meal Travis and I shared in Rome in a little plaza overlooking the Pantheon. There are things that just don’t fade in your mind such as the red gingham tablecloth, the fact that it was probably 45 degrees but the heat lamp next to us kept us warm, the view (of course), and the FOOD. Focaccia was served along with my entree of Fettuccine Alfredo in a Parmesan cheese bowl. Yes, best day ever. 

focaccia

prepared biga (I could have used a larger bowl)

Let’s think about this a little longer to let it sink in. There was a basket of focaccia served to us, perfectly crisp from being smothered in olive oil before baking. There was Fettuccine Alfredo, possibly one of my most favorite dishes. There was a BOWL made out of Parmesan cheese. A BOWL, people. It was wonderful and I loved it. I ate it all. You don’t let focaccia and Parmesan bowls go to waste when you’re in Italy. You just don’t.

focacciaI won’t pretend that this focaccia can come close to the memory that I have of that meal. I have to face the fact that I do not live in a plaza next to the Pantheon so it’s a bit hard to recreate the mood. BUT, I will say that the time that goes into this bread is worth every last mouth-watering bite. You will not be disappointed. The ingredients are so simple but scrumptious when combined the right way. The bread isn’t greasy from the olive oil. It’s rich and crisp and wonderful. I have nothing more to say than go now. Go now, and make this bread. Now. Please.

focaccia

Rosemary Focaccia
Yields 2
Rosemary, olive oil yeast bread
Print
Cook Time
20 min
Total Time
10 hr 50 min
Cook Time
20 min
Total Time
10 hr 50 min
Ingredients
  1. 2 cups lukewarm water, divided
  2. 2 teaspoons dry yeast, divided
  3. 4 1/2 or 5 cups all-purpose flour, divided
  4. 1/2 cup extra-virgin olive oil, divided
  5. 1 1/2 teaspoons table salt
  6. 2 teaspoons rosemary
  7. 1 teaspoon sea salt
Instructions
  1. Prepare the biga the night before baking the focaccia - combine 3/4 cups of lukewarm water and 1/4 teaspoon yeast in a medium bowl. Stir to dissolve. Mix in 1 1/2 cups of the flour. Cover the bowl with plastic wrap and let rise in warm spot for at least 8 hours.The biga should be light and airy when it's ready.
  2. Combine the remaining 1 3/4 teaspoons of yeast and 1/4 cup water in the bowl of a stand mixer. Add the biga, 1 cup of water, 3 cups of flour and 3 tablespoons of olive oil. Mix for about 2 minutes on low, add 1 1/2 teaspoons table salt, and mix for another 3 minutes on low. If the dough is sticky, add the remaining 1/2 cup of flour in small increments until it is no longer sticky.
  3. Place the dough in a large bowl coated with olive oil and cover with a damp kitchen towel.
  4. Let it rise is a warm place until doubled, about 45 minutes. Knock down the dough and fold it over a few times before covering again and letting it rise another 45 minutes.
  5. Coat two 9" metal* cake pans with olive oil (about 1/2 tablespoon each). Split the dough in 2 and place half in each of the cake pans. Spread the dough out until it reaches the edges. Cover with a damp kitchen towel and let rise for about 45 minutes.
  6. Preheat oven to 400 degrees Fahrenheit. Use your fingers to poke indentations in the dough. Pour 2 tablespoons of olive oil over each focaccia (this will pool in some of the indentations). Sprinkle the rosemary and sea salt (I used pink sea salt but regular sea salt is good too) over the focaccia and bake for about 20 minutes, until golden brown.
  7. Cool on wire racks before serving.
Notes
  1. Make sure to start the biga for this recipe the night (or at least 8 hours) before trying to make the bread. It's a long process, but worth it!
  2. Pretty much everything in this recipe is divided! Please note the amounts needed for the biga and for the bread-making process in the directions.
  3. *I tried this recipe in a glass baking dish and it did not come out as crispy as when I used the metal pans. However, you could use an 8x8" or 9x9" metal baking dish if you do not have round cake pans.
Adapted from "Baking Boot Camp" by The Culinary Institute of America and Goldstein via A Chookie Cookie
Flavor From Scratch https://www.flavorfromscratch.com/

Spinach and Cheese Manicotti

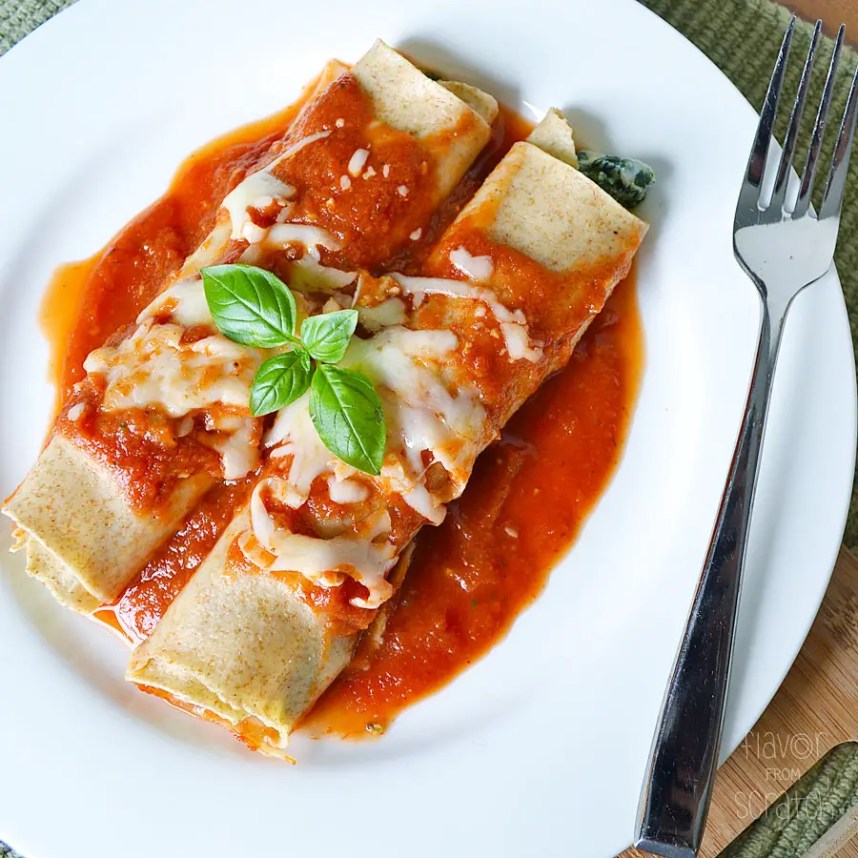
Spinach and Cheese ManicottiI’m approximately 0% Italian by blood. My husband is also 0% Italian I’m pretty sure. We are both pale, blue-eyed, and blonde-haired. I’m cool with that. However that doesn’t stop me from channeling my inner Italian to cook dishes like this spinach and cheese manicotti that are oh so *delizioso*. Yeah. That was my inner Italian coming out. Sorry.

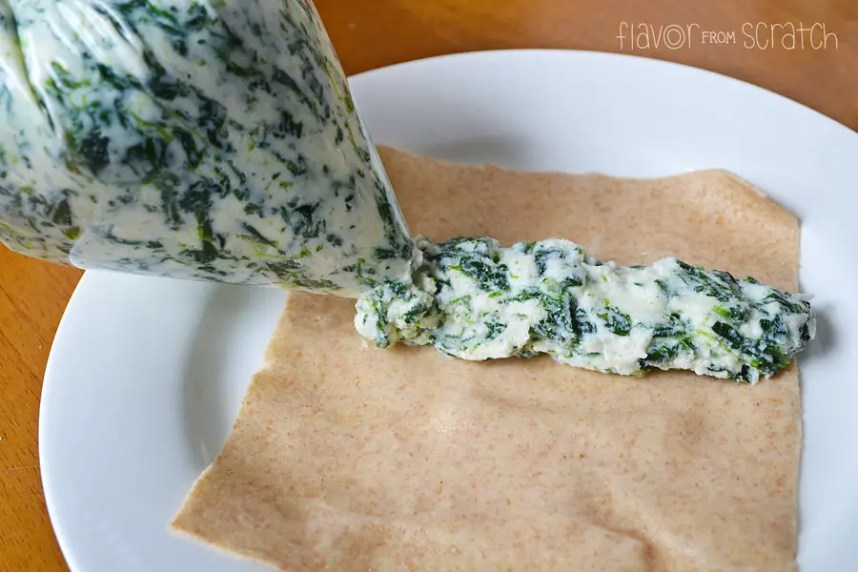
Spinach and Cheese ManicottiI actually didn’t have manicotti to make this manicotti recipe because that’s how I roll. BUT, I was able to make some homemade lasagna noodles that I rolled up with the filling inside and it worked great! You certainly can buy manicotti or use store-bought lasagna noodles cut in half. Honestly, I couldn’t find manicotti at the store after I put everything else for this recipe in my cart. Since I’m too lazy to go to another store or ask where the manicotti may be, I made the noodles. The truth comes out. 

Spinach and Cheese ManicottiYou are also more than welcome to make your own pasta sauce for this recipe. I often do have homemade sauce in my freezer but for this recipe I took the easy way out and bought a nice store-bought sauce. It did the trick! 

Spinach and Cheese ManicottiOne thing I love about this otherwise cheesy and carb-filled recipe is that it does sneek some veggies in there! Apparently now that I have a little one I think about hiding vegetables in food. Such is life. The little guy’s only a couple months old though so he pretty much has a one track mind and it’s focused on milk right now.

Spinach and Cheese Manicotti
Manicotti stuffed with a 3-cheese and spinach filling and topped with your favorite pasta sauce
Print
Prep Time
15 min
Cook Time
30 min
Total Time
45 min
Prep Time
15 min
Cook Time
30 min
Total Time
45 min
Ingredients
  1. 10 ounces frozen spinach
  2. 15 ounces ricotta cheese
  3. 1 1/2 cup shredded mozzarella cheese
  4. 1/2 cup Parmesan cheese
  5. 1 egg
  6. salt and pepper, to taste
  7. 10 manicotti, cooked*
  8. 24 ounce pasta sauce (homemade or store bought)
Instructions
  1. Preheat oven to 350 degrees Fahrenheit.
  2. Cook the frozen spinach according to packaging (I microwaved mine in a microwave-safe bowl). Place the cooked spinach in a kitchen towel and let drain. Squeeze the excess water out by twisting and squeezing the towel.
  3. Mix the spinach, ricotta cheese, 1 cup of the mozzarella cheese (the remainder is for the top), Parmesan cheese, egg, and salt and pepper together in bowl. Transfer to a zip top bag. Seal the bag and cut a corner off to create a piping bag.
  4. Squeeze the cheese mixture into the manicotti. This is easiest to pipe a little from each side to make sure you get the mixture all the way through the noodle.
  5. Spread 1 cup of the pasta sauce on the bottom of a lasagna pan. Place the manicotti in the pan, top with the remaining pasta sauce and reserved 1/2 cup of mozzarella cheese.
  6. Bake for 30 minutes.
Notes
  1. *I used homemade whole wheat lasagna noodles that I cut in half and rolled up once I put the filling in them. Either way works!
Adapted from The Cooking Jar
Flavor From Scratch https://www.flavorfromscratch.com/

Chicken Parmesan

Chicken ParmesanEvery once in awhile I get a hankering for a classic and simple dish like Chicken Parmesan. I mean, you can’t go wrong with a classic. It just so happens that this is a fairly classic recipe made oh-so-delicious with a panko breadcrumb and Parmesan coating. If you aren’t familiar with panko breadcrumbs, think breadcrumbs but lighter and crispier. You can find them in basically every grocery store, if not every one, so don’t worry that they’ll be hard to find. It’s worth it. For real.

Chicken ParmesanI’ve only ever actually made Chicken Parmesan maybe a couple times in my life. This is a dish that’s so easy to order at a Italian restaurant and it’s pretty much always delicious. Where can you really go wrong with breaded chicken, cheese, and pasta? It’s like you’d have to *try* to make those ingredients taste bad. Even though I’ve made it before, I for some reason was convinced that it would be hard to make and would be a disaster. False. Totally false. This recipe is not hard to make at all. And it totally was not a disaster. Note to future Steph thinking Chicken Parmesan is hard to make…IT IS SO EASY!

Chicken ParmesanThe main advice I have for anything breaded is just to prep well. As you may or may not know, I am a very experienced cook so you should all listen to any and all advice that I have. That’s a joke…my experience is limited. However, you can be assured that any advice I post is from personal experience. So that’s a win for you! Once you have the 3 pans (flour mixture, egg mixture, and breading) ready to go, you’re basically golden. The rest is just a little cooking on the stove top and in the oven. Easy peasy.

Chicken ParmesanThe moral of the story is that no matter how delicious Chicken Parmesan can be at a restaurant, you can easily make it just as (if not more) delicious in your own home. Your own home, folks.

Chicken Parmesan
Serves 4
Simple and delicious Chicken Parmesan with a light and crispy breading
Print
Prep Time
10 min
Cook Time
25 min
Total Time
35 min
Prep Time
10 min
Cook Time
25 min
Total Time
35 min
Ingredients
  1. 4 boneless and skinless chicken breasts
  2. 1/2 cup flour
  3. salt and pepper, to taste
  4. 2 eggs, whisked
  5. 1.5 cups panko breadcrumbs
  6. 1/2 cup Parmesan cheese
  7. 1/2 cup olive oil
  8. 2 tablespoons butter
  9. 1 cup pasta sauce
  10. 4 slices mozzarella cheese
  11. basil, optional, to garnish
Instructions
  1. Preheat oven to 450 degrees Fahrenheit.
  2. Place chicken (1-2 breasts at a time) in a plastic zip top bag. Use a rolling pin to pound each chicken breast to about 1/2" thick. Set aside.
  3. Mix together the flour and salt and pepper, to taste. Pour mixture onto on a plate or large flat pan and set aside. Have another pan (with edges) ready with the whisked egg and salt and pepper, to taste. In a 3rd pan, mix the panko breadcrumbs and Parmesan cheese. Dredge the pounded chicken in the flour mixture, coat with the egg mixture (let extra slightly drain off), and finally coat in the breadcrumb mixture.
  4. Heat the olive oil and butter in a large saute pan over medium to medium high heat. Once the oil is heated, add the dredged chicken into the pan and cook 2-3 minutes per side, until just golden brown.
  5. Place the chicken on a parchment-lined baking sheet. Cover each piece of chicken with about 1/4 cup of pasta sauce, mozzarella slices, and basil.
  6. Bake in a preheated oven for 10-15 minutes, until cooked through and the cheese is melted.
  7. Serve over pasta.
Flavor From Scratch https://www.flavorfromscratch.com/